

Preacher Tobe / Brisket
Redneck Smoked Brisket
A complete process spec for selecting, trimming, seasoning, smoking, finishing, slicing, and serving brisket
The complete process
Redneck Smoked Brisket
Selection, trim, seasoning, smoke, covered finish, tenderness, slicing, and serving.
12 letter-size pages, ready to printDownload PDFThe rub
Missy's BBQ Rub
The seven-ingredient family finish and exactly how I apply it to the brisket.
1 letter-size page, ready to printDownload PDFThe sauce
Harold's BBQ Sauce
The full recipe, including the onions, garlic, straining, and saved brisket drippings.
2 letter-size pages, ready to printDownload PDFThe cook at a glance
| Stage | Setting | Decision |
|---|---|---|
| Cold prep | 15–16 lb packer | Trim to ¼ inch all around |
| Smoke | 185°F for about 10 hr | Flavor stage; fat-side down |
| Covered finish | 225–250°F; about 5–8 hr | Four probes; thick + middle of each muscle |
| Tenderness check | Begin around 195°F | Pull each piece when toothpick-smooth |
| Hot hold | At or above 140°F | Keep whole and sealed |
| Slice | Flat ¼–5/16 in; point ⅜–½ in | Across the grain; slice to order |
I'm a little different, make of that what you will
I'm a redneck who can smoke a great piece of meat. This is my process: I use a pellet smoker for a long dose of smoke, then a thermally stable covered cooker to finish each part to my taste.
The point and flat are different muscles. I separate them before cooking, put two thermometer probes in each, and treat them as two cooks that share pretty much the same process. The point can take more heat and usually needs more time. The flat can't. Separating them makes the temperatures easier to manage and makes slicing and chopping a whole lot simpler. It also allows me to trim the fat more carefully, which I like.
The short(ish) version
- Buy a 15- to 16-pound whole packer with a thick, even flat and no obvious mountain of waste fat.
- Trim it cold to about ¼ inch of fat all around and (if you want) separate the point from the flat. If you're a beginner don't try to separate these muscles, just get a good ¼" trim all around. Treat the rest of these instructions accordingly.
- Season every surface with kosher salt and fresh coarse-ground black pepper. Finish with a thin layer of white sugar, or use Missy's BBQ Rub instead of the sugar.
- Refrigerate overnight when time allows.
- Put both pieces fat-side down over indirect heat in a pellet smoker at 185°F for about 10 hours. The smoker is my flavor stage—it's not really about the cook here, more about the flavor.
- Move them to a fully preheated covered roaster at 225–250°F. Put two probes in each muscle.
- Begin checking when a probe reaches 195°F. Temperature tells me when to check it; but the tenderness tells me when to pull it.
- Keep each piece whole until it's served. Slice perpendicular to the grain or chop to order.
Buying a brisket
Shape and usable meat matter more to me than the name on the package. I've cooked different brands and grades, and it is still a bit of a crapshoot. A higher-grade Black Angus brisket is not guaranteed to beat a decent generic one. Sometimes the expensive brisket just gives you more expensive fat to throw away. I once trimmed 5 pounds of fat off a 16-pound brisket. That did not make me happy.
I won't buy a whole packer under 12 pounds. 15 to 16 pounds is my sweet spot: big enough to cook well, but still manageable. I may go larger when I trust the butcher not to screw me over on the trim.
The flat should stay reasonably thick toward its end. A flat that tapers down to paper thin will be overdone at the tip before the thicker meat is ready. Some taper is just part of the deal if you smoke a brisket. Avoid an extreme taper.
For a crowd, I plan on about ½ pound of purchased, untrimmed brisket per adult. A 15-pound brisket means about 30 adults, and that normally lands me on the safe side. I started using that rule based on Meathead Goldwyn's website. He uses a half-pound raw-meat planning rule in his party-planning guide.
Equipment that actually matters
Buy good temperature probes. That may be the most important purchase a new "pitmaster" makes. My current setup uses four wireless probes: one in the thickest part of each muscle and another around the middle of each. The middle probes are the canaries in the mineshaft. The thick probes are what I use for gauging the real cook. This is the set we use and like, although plenty of brands can work.
Buy real high-temperature grill gloves. They should have long gauntlet cuffs, an insulated lining, a waterproof rubberized exterior, and textured hands that can grip greasy meat. These make checking and moving big hot chunks of brisket easy, and you're less likely to damage the bark using these. One tip: I spritz the gloves before I touch the meat once it's started cooking so they're less likely to stick to the bark and pull any off.
Gloves for general food-use are also important. Black 6-mil food-safe nitrile gloves are my everyday cooking gloves because they give me good dexterity and a little protection from minor heat discomfort. These things just make everything easier. They do not replace the insulated grill gloves.
Here's pretty much everything in my setup equipment-wise:
- Pellet smoker. Mine is a Green Mountain Grills Daniel Boone from somewhere around 2016–2018.
- Charcoal pellets and pure oak pellets, mixed 50/50.
- 21 X 15-inch baking sheet and a wire rack that raises the meat about 6 inches.
- Large covered electric roaster, roughly 22–24 quarts, with an internal rack. A large covered pot in a conventional oven also works.
- Four leave-in wireless meat probes.
- Ordinary spray bottle filled with plain water.
- Sharp, thin, medium-length trimming knife; long thin slicing knife; larger butcher-style chopping knife; honing steel.
- Biggest cutting board that fits the workspace, plus a big serving platter.
- High-temperature grill gloves and 6-mil food-safe nitrile gloves.
- Plastic wrap, butcher paper for the occasional wrapped finish, toothpicks, zip-top bags, and Mason jars for saved drippings.
- For sauce: cast-iron skillet, large pot, blender, and an ordinary spaghetti-style colander.
Quality beats name brands or "extreme" features. Just get really solid versions of the basics. Yes, you can get by with cheap stuff (if you already know what you're doing), but even then it makes it a lot more work than it needs to be.
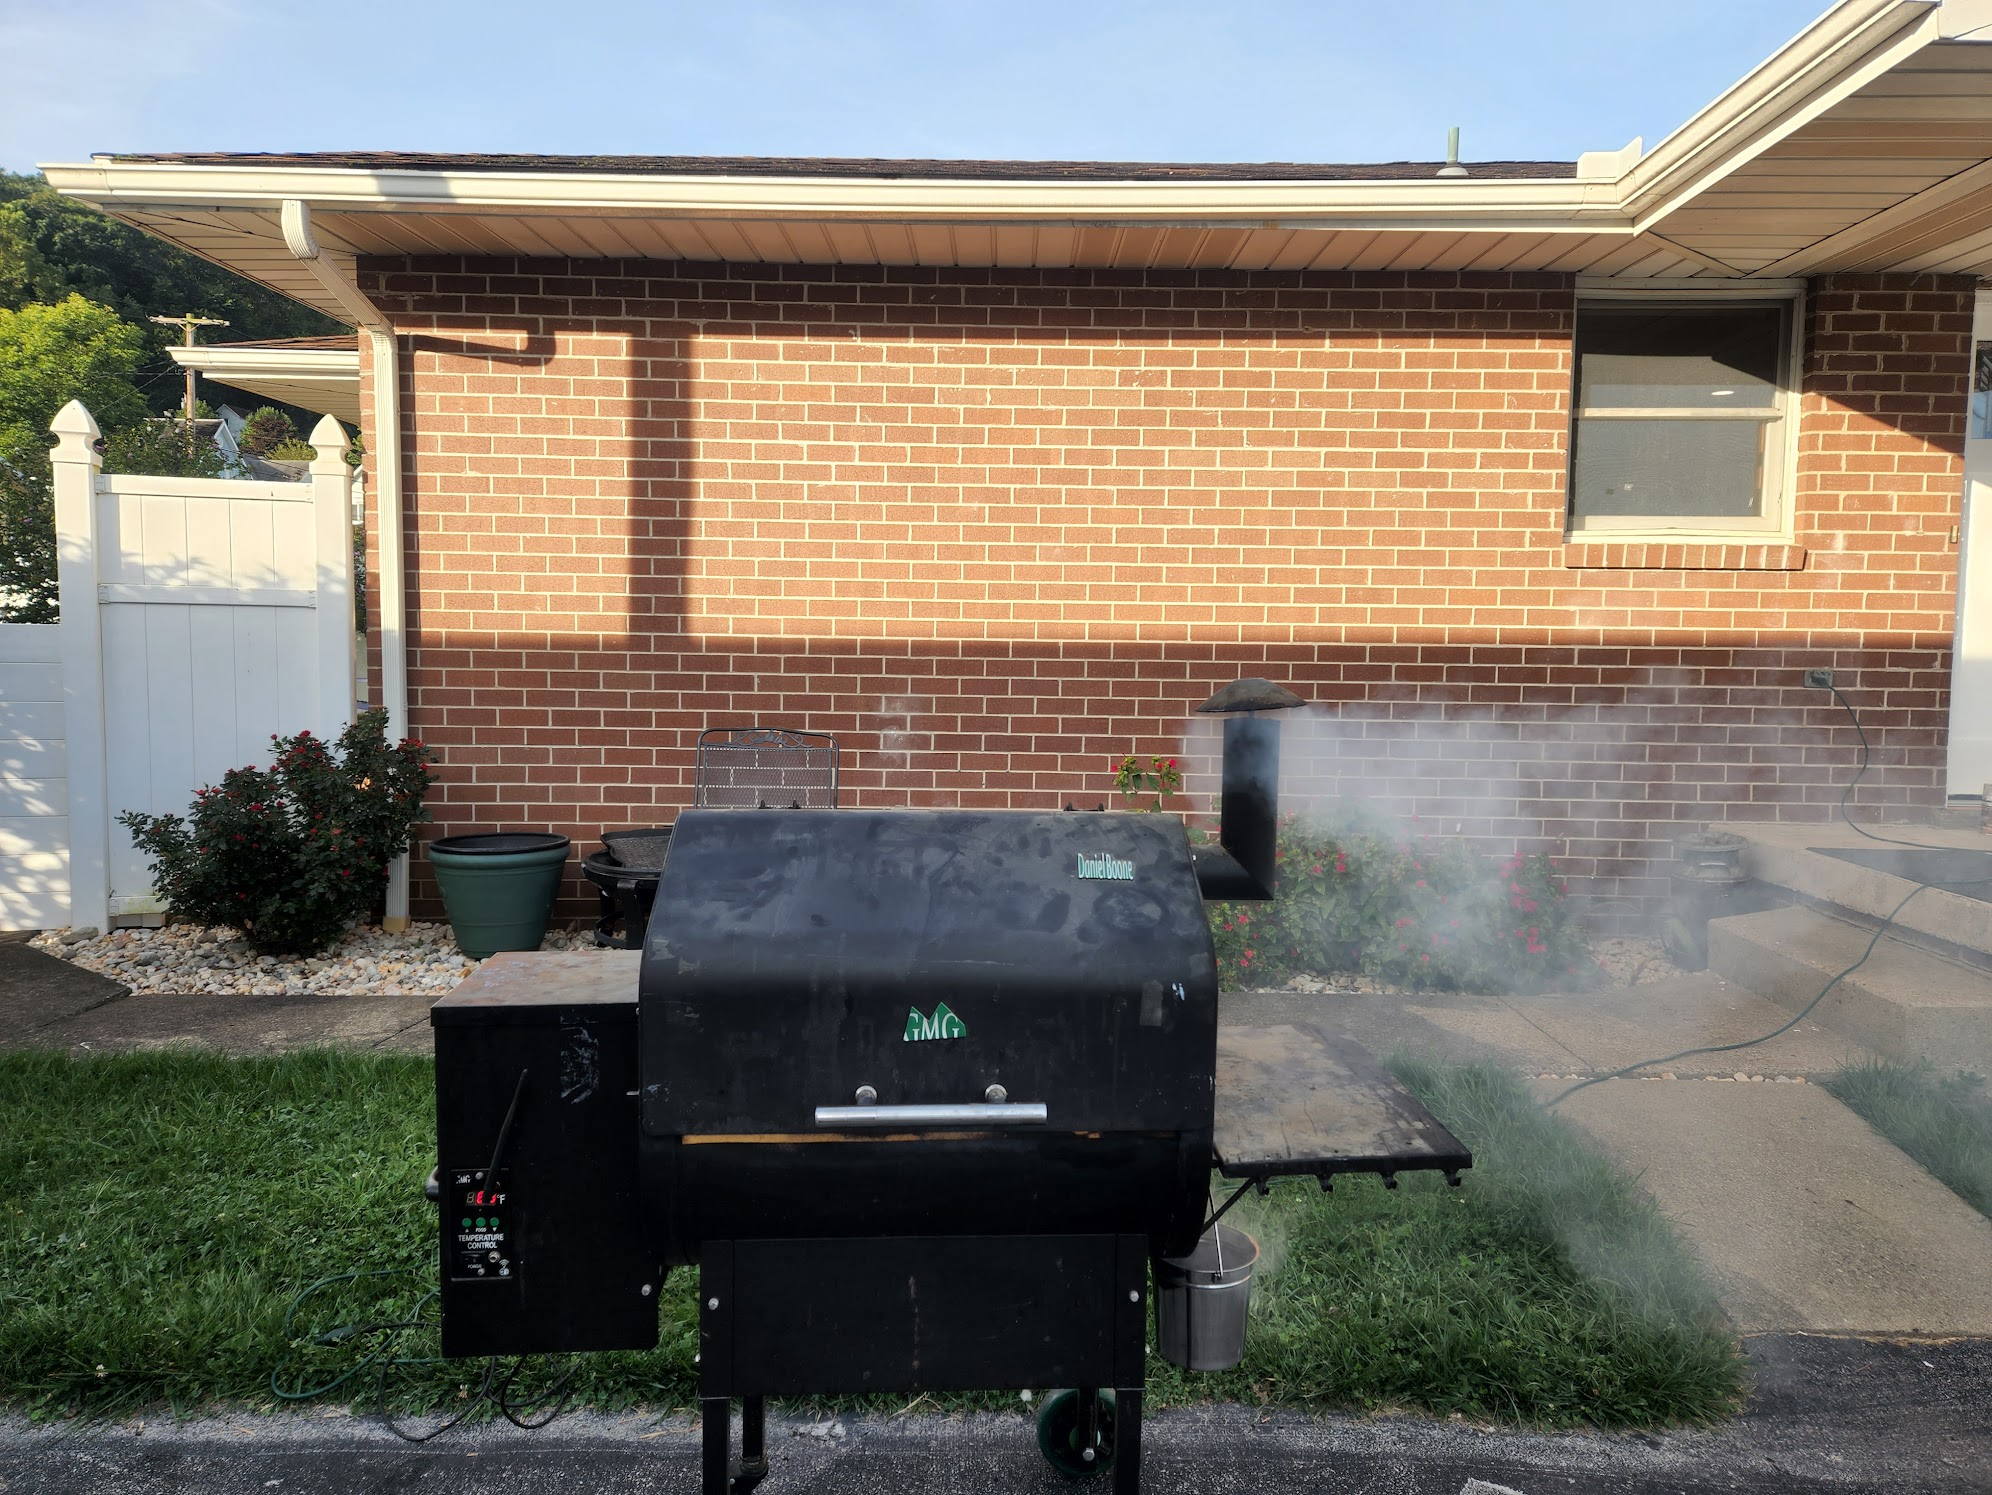
My beat up old Green Mountain Grills Daniel Boone pellet smoker
Trim it cold and trim it enough
Cold fat is easier to control. Use a sharp knife that fits your hand. A giant knife may look cool, but if you are not used to it, it's awkward as the dickens. A thin medium-length blade gives you better control when you trim.
Trim the exterior fat ¼" all around. Remove the lion's share of the silver skin and any actual gristle. I leave hard fat when it is already ¼" or thinner. I clean up the ragged bits just a little. I ain't tryin' to sculpt a museum piece.
This next part is only once you've done a few briskets, learned the muscles, and gotten good at the trim:
Follow the seam and separate the point completely from the flat. Try to retain about ¼ inch of fat on the newly exposed surfaces, although the meat doesn't always make that possible. If the flat has a thin tip, I leave it and accept that it will be more done. Sometimes I pick that barky piece off and eat it myself.
Fat is insulation. Leaving an inch of it throws off the cook, it will not turn into a pleasant bite, and nobody will eat it. When you serve, an even ¼" layer has a seasoned crust and is perfect on the slice. If the fat's gotta be cut off or scraped off when you serve it then you didn't trim it right.
When the knife isn't cutting smoothly at any point in the process, stop. Clean the fat off the blade, dry it, then give it a couple of swipes on a honing steel. A dull knife is ineffective and sucks to use. I usually have to do this at least twice during a trim.
Aaron Franklin's 21-minute Brisket Camp trimming demonstration is where a beginner should learn the discipline. My current process goes farther because I separate the two muscles completely. As I often say, I'm just a redneck who knows how to smoke a good piece of beef, but he's the guy who has perfected brisket engineering.
Season every surface
I do not use a binder. Mustard, oil, Worcestershire, and the rest have never added value for me. They add mess. If the brisket is still very cold and the surface needs help holding seasoning, I mist it with plain water.
First comes kosher salt. I normally use Morton because that is what Missy buys, but I am not married to the brand. Kosher flakes are easy to see and spread. Table salt disappears the second it hits the meat. Cover every surface with one uniform layer and avoid clumps. The flakes may physically cover about 80 percent because there are spaces between them, but the closer you can get to complete even distribution the better.
Next comes black pepper, ground fresh from whole peppercorns. Freshly ground pepper really does matter. I aim for fairly coarse pepper and do not care if the particle size varies. The pepper layer is visibly sparser than the salt.
Then choose one of two finishes:
- My preference: a very thin, even layer of white sugar at about half the salt coverage. Brown sugar tastes a little better to me, but white spreads better and produces better bark. Either works.
- The family preference: Missy's BBQ Rub instead of separate sugar. I like a minimally visible coating all around. My gang likes more.
Lightly spray the seasoned pieces with water, cover them with plastic wrap, and refrigerate overnight when possible. Sometimes they go straight into the smoker. 2 or 3 days in the refrigerator has worked for me, but I cannot tell that anything beyond about 24 hours improves it.
Missy's BBQ Rub
Mix it thoroughly in a jar and keep it covered in a dry place.
- 1 cup dark chili powder
- 1 tablespoon garlic granules
- 1 teaspoon onion powder
- ½ teaspoon cumin
- 2 tablespoons Lawry's Seasoned Salt
- ¼ cup black pepper
- ½ cup white sugar
The chili powder needs to be dark. If the package literally says dark chili powder, slam dunk. Otherwise, eyeball it. Pale chili powders won't give this rub the flavor it needs.
Build an indirect smoke chamber
I mix charcoal pellets and pure oak pellets 50/50. A full hopper easily runs 10 hours at 185°F.
I put a 21 X 15-inch baking sheet on the smoker's main rack. I set a raised wire rack above it so the meat sits about 6 inches higher. I put the point and flat on that upper rack fat-side down. The fat takes the brunt of the heat through the entire process.
The baking sheet blocks the direct heat and makes my smoker remarkably even. I'll sometimes add a little water in the baking sheet for humidity. I usually start this in the evening so it can run through the night. As long as I'm still awake, I'll spritz the meat with plain water every hour to 90 minutes. Smoke adheres to moist meat better. Before bed, I'll double check that there's enough water to barely cover the sheet's bottom and leave the smoker closed until morning.
I put refrigerator-cold meat into the cold smoker and start the two together. I set it to 185°F and let it run for about 10 hours, regardless of brisket size. At that low temperature I am not trying to finish the cook. I am trying to get every bit of smoke flavor the pellet smoker can realistically give me. I do not rotate or move the pieces.
When the weather is below about 45°F, I lay a high-temperature welding blanket over the main chamber lid. It keeps the cooker from running like crazy all night and keeps the temp in the main chamber more even.
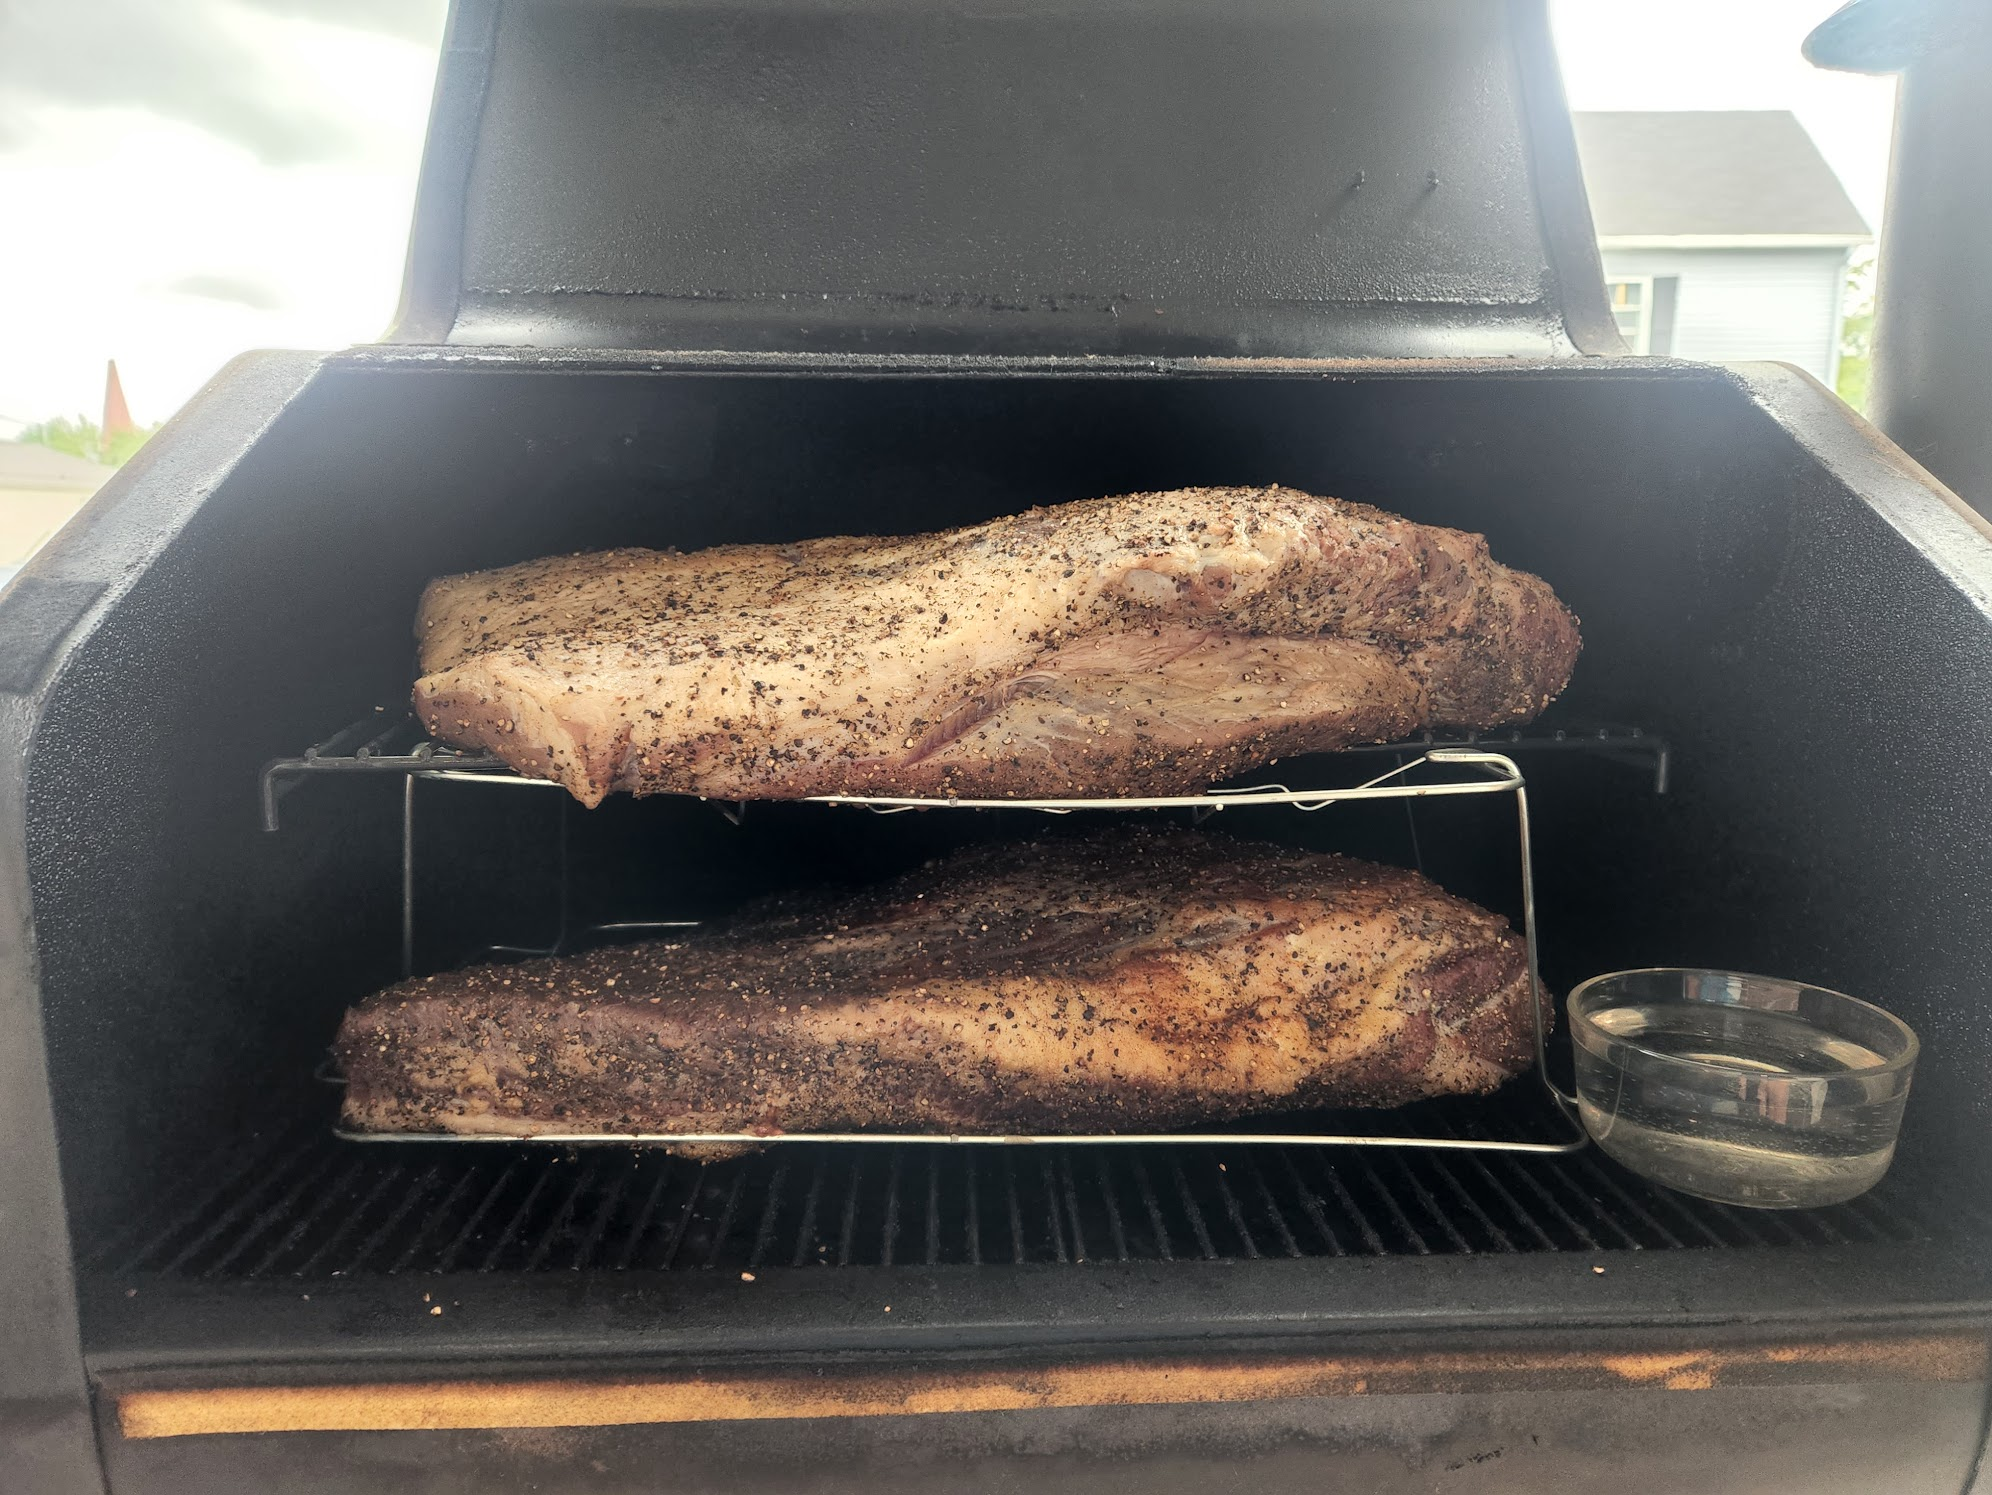
An older two-brisket setup before I added the baking-sheet heat barrier
The photograph above is historical, not the current setup. Those were two whole briskets over 18 pounds each. I rotated them every 2 hours and finished one in the oven and one in the smoker.
Finish in a thermally stable cooker
Thermal stability is the key. I want the temperature I set to be the temperature everywhere, without the chamber cooling and reheating in big swings.
My normal finish is the largest electric roaster I could find, about 22–24 quarts. I put its wire rack in place, add enough water to barely cover the bottom, close it, and preheat it fully to 225–250°F before the meat goes in. An analog roaster can overheat at the sides while climbing to temperature.
After the 10-hour run in the pellet smoker, move the point and flat onto the rack fat-side down. Arrange them basically however you can to fit, but I put the thicker ends toward the walls of the roaster. If they must overlap, put the thin ends together. Insert the four wireless probes: thick and middle in the point, thick and middle in the flat.
My old roaster runs more evenly when I put a towel over the outside of its metal lid. That reduces heat loss and long heating cycles.
Check the roaster once after about 90 minutes. I am looking for a stable chamber that's not wildly off. If the top of the brisket pieces looks visibly cold, I nudge the setting up. If the edges act like they want to burn, I turn it down. After an adjustment, I check again in an hour. I don't think I have ever needed more checking than that.
After the stability check, leave it alone until one of the probes hits 195°F. The roaster phase normally takes another 5 to 8 hours, but it varies wildly. A full cook usually lands around 15 to 18 hours.
If time is getting short, I raise the roaster temperature. I have gone as high as 325°F, but at that point I watch every tick of the thermometer live. A hotter finish can make a nicer bark, but it eliminates the margin for error.
Conventional oven alternative
A conventional oven will get the job done in a pinch. I use a very large stainless oblong pot with a ⅜-inch-thick bottom and an all-steel lid. The point and flat go directly into the dry pot fat-side down. The covered pot creates its own liquid, so I do not add water at the beginning. Run the oven in the same 225–250°F range. The real problem is finding a pot big and deep enough to prevent overflow and a big mess in the oven and an angry wife.
Smoker-only alternative
After the 10-hour smoke stage, raise the smoker to 250–275°F. My indirect setup needs that much heat to finish. I rarely wrap, and only if I go this route. If I wrap, I wait until the bark looks as good as I can get it and use butcher paper, never foil. Wrapping stops bark development and softens what is already there.
Good bark looks fully cooked and set: very dark red moving toward brown or nearly black, with a crisp, chewy, sticky surface. If wrapped bark needs help before you serve, unwrap the meat, place it on a baking sheet, and broil it for about 2 minutes. Do not walk away. Sugar and bark can burn in a hurry.
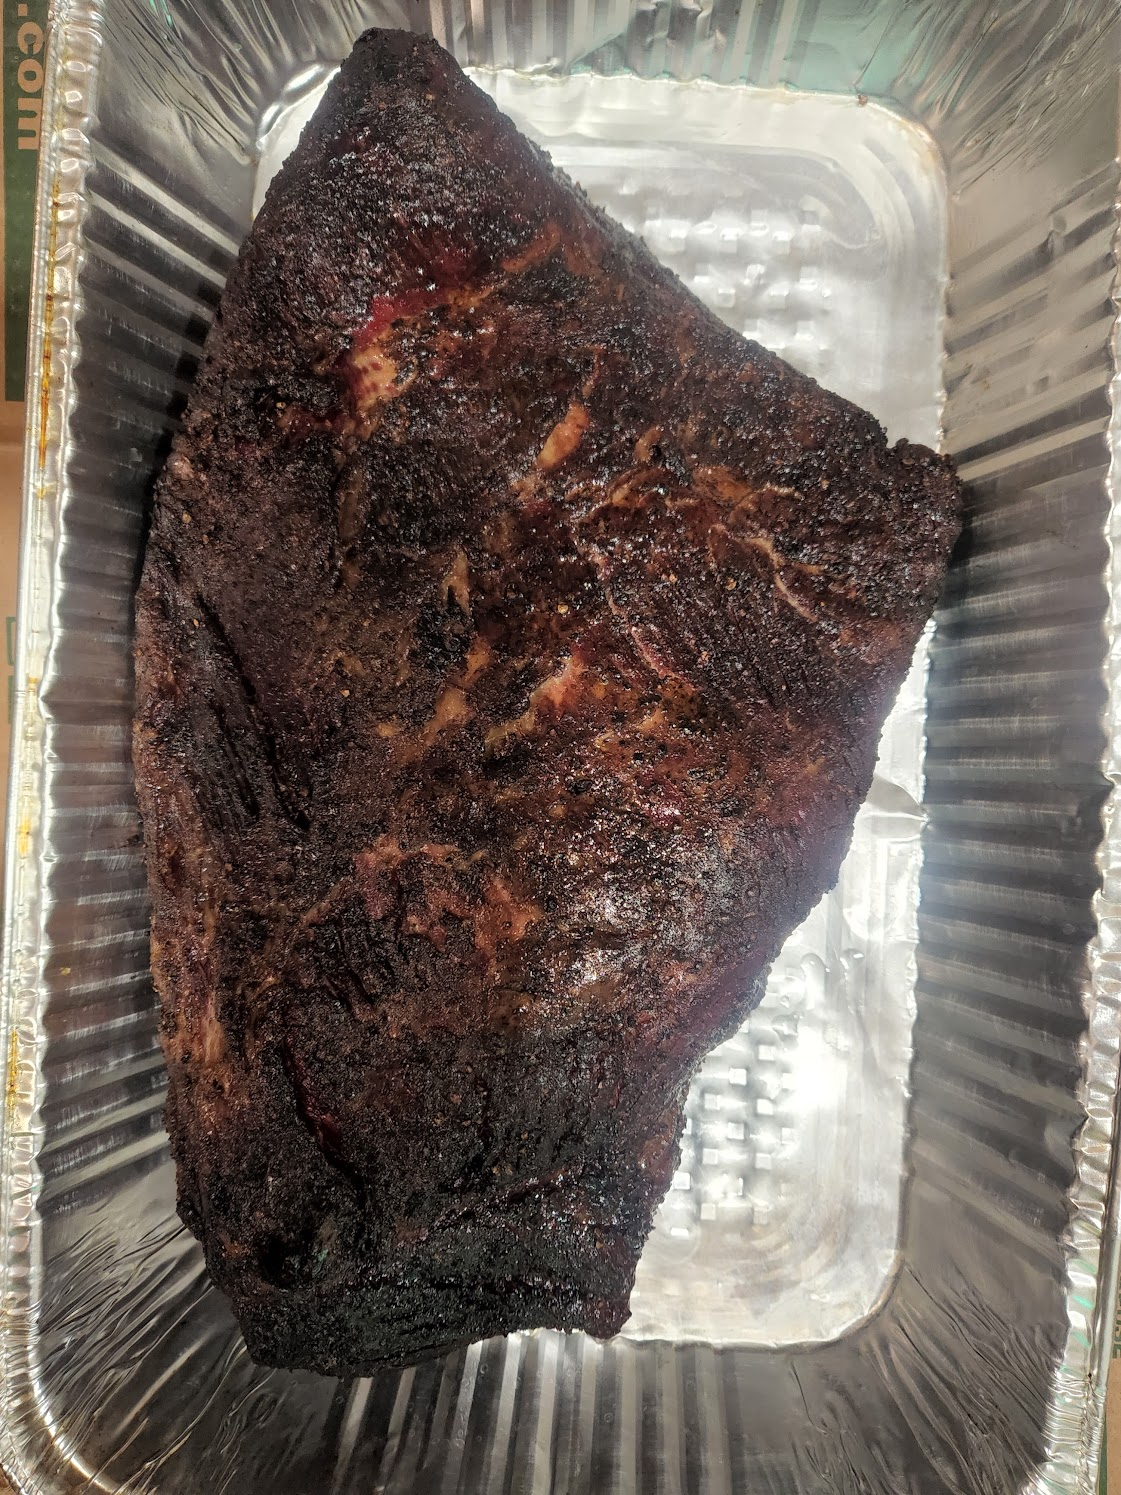
Acceptable but uneven bark on a whole brisket
That bark is acceptable, but uneven. The thin end went too far while the thicker section could have developed more. Oh well, live and learn.
Temperature tells you when to touch it
Begin checking when either piece reaches 195°F. Put on the high-temperature gloves and pick it up. A tender piece feels different. Then push a toothpick or something about that size into the thickest part. If it slides in and back out smoothly, pull that piece. If it resists, keep cooking and check again after another 3 to 5 degrees, or another half hour, whichever comes first. Sometimes a piece of meat just has to hold at a certain temp to get tender.
The point needs to get hotter than the flat. That is fine. Pull each one when it is ready. If you separate them, like I normally do, don't hold the flat hostage because the point's not done.
I don't "rest" the meat. It doesn't do anything, and there are plenty of guys who've done the science to verify this. More important than whether or not you rest it is that you WAIT to cut the meat until you are literally serving. The moment the knife starts going in, the meat starts to dry out.
If it finishes early, keep it whole, sealed, and at or above 140°F. I leave the probes in. My roaster has a Warm or Serve setting, and I use the absolute minimum heat required to maintain temperature.
Slice and serve
Slice perpendicular to the grain. Separating the muscles makes the grain easy to see instead of forcing you to fight two directions at once.
- Flat: ¼ to 5/16 inch thick.
- Point: ⅜ to ½ inch thick.
A properly cooked slice should pull apart almost effortlessly by hand. Either muscle can also be chopped. I like mine chopped more fine; other people like chunks. Same same. When I serve, I give the people what they want. By that time I have usually handed out enough samples that everybody has a pretty good idea of what they want.
Leave the rendered fat edge attached. With a true ¼-inch trim, it has a good crust and blends into the bite.
Serve with Harold's BBQ Sauce slightly warm and on the side.
The five big mistakes that newbs make
- Not trimming enough. Thick fat is insulation, and the part nobody will eat should not control the cook.
- Cooking without thermometers, or trusting temperature alone. Temperature tells you when to test. Your hands and the toothpick tell you when it is tender.
- Slicing ahead of time. It is disastrous. Don't slice it until you're ready to hand it to somebody.
- Leaving bare patches in the salt and pepper. Cover every surface evenly.
- Going too light on smoke. A pellet smoker is already mild. My 10-hour stage exists to get all the smoke it can give me.
Harold's BBQ Sauce
Base recipe
- ½ cup strong brewed black coffee
- 1 cup Lea & Perrins Worcestershire sauce
- ¾ cup quality plain ketchup; we usually use Heinz
- ½ cup apple cider vinegar
- ½ cup brown sugar
- 3 tablespoons dark chili powder
- 2 teaspoons table salt
- 2 cups diced yellow onions
- ¼ cup ordinary crushed red pepper flakes, the pizza kind
- 6 garlic cloves, minced
- ½ cup bourbon you like; oakier is better
- 1 teaspoon garlic powder
- 1 tablespoon cumin
- ½ tablespoon ground mustard
- At least ½ cup Brer Rabbit Full Flavor or Blackstrap Molasses, then more to taste
The coffee should be strong ordinary brewed coffee. Missy and I grind our own blend, roughly 80 percent French roast and 20 percent Colombian, and brew it stronger than most folks would. The exact blend does not matter, just make it strong.
The onions are huge
Cook the diced yellow onions low and slow in a dry cast-iron skillet with zero oil. I use this rule for caramelized onions in almost everything. Deglaze occasionally with a little water.
For a big sauce day, start them on the stove. Once they are browning, deglaze, stir, and put the skillet in a 275°F oven for an hour or longer. Finish them on the stove. They are ready when they reach the color of brown sugar and begin losing their structure. I would cook them into a paste if it were entirely up to me, but Missy does not want to wait 6 to 8 hours just for onions.
Mince the garlic and cook it dry in cast iron too, using much lower heat. Garlic burns easily. The goal is to deepen its flavor and take the raw edge off without scorching it.
Put the sauce together
While the onions are in the oven, combine everything else except the optional brisket drippings in a large pot over low heat. Add the garlic whenever it is ready. Add the onions when they are ready. Simmer the whole pot on low for at least 1 hour. Longer is fine. Less than an hour is probably not.
Blend the sauce to a medium puree, then press it fairly well through an ordinary spaghetti colander. It does not have to be perfectly smooth. Cheesecloth would work, but it is a mess. We have tried leaving the solids in, and both of us think the strained sauce literally tastes better. I cannot explain it. The paste left behind gets thrown away, which makes us sad every time.
Saved brisket drippings
The sauce is good without drippings. Once you get into a rhythm, the drippings put it over the top.
Pour roaster drippings into Mason jars, cool them, and remove enough semisolid fat to leave no more than about 20 percent fat by volume. Label, date, and freeze them. When the sauce has been blended and strained, add thawed drippings gradually to taste, then simmer another 15 minutes.
Missy's working large batch is 6 times the base recipe, about 1 gallon finished, with roughly 1 pint of drippings. Those are practical estimates. Taste it along the way.
We pressure-can large batches in Mason jars, but canning is outside the scope of this process. Refrigerate the sauce after opening if you pressure-can it.
Leftovers
Do not slice more than you serve. Refrigerate the point and flat in the largest intact pieces possible, usually in a zip-top bag with a little of the drippings. I can't prove the drippings help, but I do it anyway.
For reheating, I slice it, put the slices in a medium-hot cast-iron skillet and fry them like bacon. For chopped brisket, start the same way, then add sauce and break the slices into pieces.
Learn from Franklin
The free BBQ with Franklin video series covers the engineering behind brisket, pits, fire, smoke, and meat. If YouTube changes that show link, the official PBS series page carries the same program.
Franklin and I do not use the same equipment or identical process. That is part of the point. Learn the engineering standard from him, then understand what your own cooker and your own hands are telling you.
— tobe
Sources and further learning
- BBQ with Franklin free video series
- Aaron Franklin brisket trimming demonstration
- Meathead Goldwyn party-planning guide